How to Record a Rental Property’s Condition Clearly
A clear move-in and move-out record is the foundation of documenting a rental property’s condition. Use a checklist to note each room, surface, fixture, appliance, and safety feature, then support your notes with dated photos or video. Recording the same details at both stages makes it easier to compare the property’s condition over the tenancy.
It’s easy to miss a scuff, leak, or appliance issue when you’re focused on moving, and vague notes can lead to disagreements later. A simple, consistent process helps you create a useful record without making the inspection feel overwhelming. This guide explains what to check before and after a tenancy, how to capture clear photos or video, and what to record about utilities, appliances, and existing damage. You’ll also learn how to organize and share the records so they’re easy to find when needed.
Key Takeaways
- Use a consistent checklist at move-in and move-out to make changes easier to compare.
- Pair clear room-wide photos with close-ups, and add written notes for details images can’t capture.
- Record utility readings and appliance details alongside any problems you find during testing.
- Keep dated copies of reports and supporting media so you can find them if a question comes up later.
- Properly documenting rental property condition with a signed, dated checklist is essential for compliance and protecting your security deposit in Maryland.
What is the Rental Property Condition Checklist?
A rental property condition checklist records the home’s physical state at key points in a tenancy. Use the same room-by-room categories each time, then compare dated notes, signatures, and supporting records.
-
Inspect Rooms and Fixtures
Walk through each room and inspect surfaces, fixtures, and appliances before completing the checklist. In the kitchen, check cabinet doors, counters, flooring, windows, and the refrigerator. In bedrooms and living areas, note carpet stains, floor scratches, wall marks, and damaged blinds. In bathrooms, look for loose fixtures, cracked tiles, and signs of leaks.
Describe each issue by location and condition, such as “bedroom, carpet, dark stain beside closet.” Check doors and windows for cracked glass, damaged frames, and locks that don’t work. Record whether appliances operate, and note visible rust or wear. Include areas without visible damage so the record covers the entire property, not just problem spots.
-
Set Inspection Timing
Schedule the move-in inspection before belongings make floors, walls, and fixtures harder to assess. Complete the checklist within 24 to 72 hours of the lease start date, and record the date on the form. Plan a move-out inspection immediately after the tenant vacates, then compare each room with the move-in record.
For periodic inspections, use a consistent schedule that fits the lease and applicable local requirements. In Washington, landlords must give two days’ written notice before entering a rental unit for inspections and repairs, according to the Washington State Legislature. Reported defects also have response deadlines: the Washington State Legislature says landlords must begin remedial action within 24 hours when a defect cuts off hot or cold water, heat, or electricity, or is hazardous to life. For other reported defective conditions, the Washington State Legislature requires landlords to begin remedial action within 10 days.
-
Sign and Share Inspection Records
Ask the landlord and tenant to review the completed inspection record together, then sign and date it. In Washington, landlords cannot collect a security deposit without a written move-in condition checklist signed and dated by both landlord and tenant, according to the Washington State Legislature. Make sure the form identifies the property and inspection date, and that both parties can read every note before signing.
Give each party a complete copy, including attached notes and supporting records. Keep the signed version with the lease, organized by property address and inspection date. If a tenant disagrees with an entry, note the disagreement beside that item rather than leaving the checklist ambiguous. A clear record shows what each party reviewed and when.
-
Use Standardized Checklists
Use the same checklist categories at move-in, during periodic inspections, and at move-out. A consistent form makes it easier to compare a kitchen appliance or bedroom floor across inspections rather than relying on memory. Include fields for room, item, condition, issue location, and follow-up notes. Leave space for details the standard fields don’t cover.
Digital inspection tools can help organize notes, dated photos, and signed records by address and inspection date. Save the completed report and attachments in a secure digital folder, then keep a backup copy. Use clear file names, such as “Oak Street, move-in, kitchen,” so records are easy to locate. Before finishing the inspection, confirm that each room and relevant fixture has an entry.
Can I use video instead of photos?
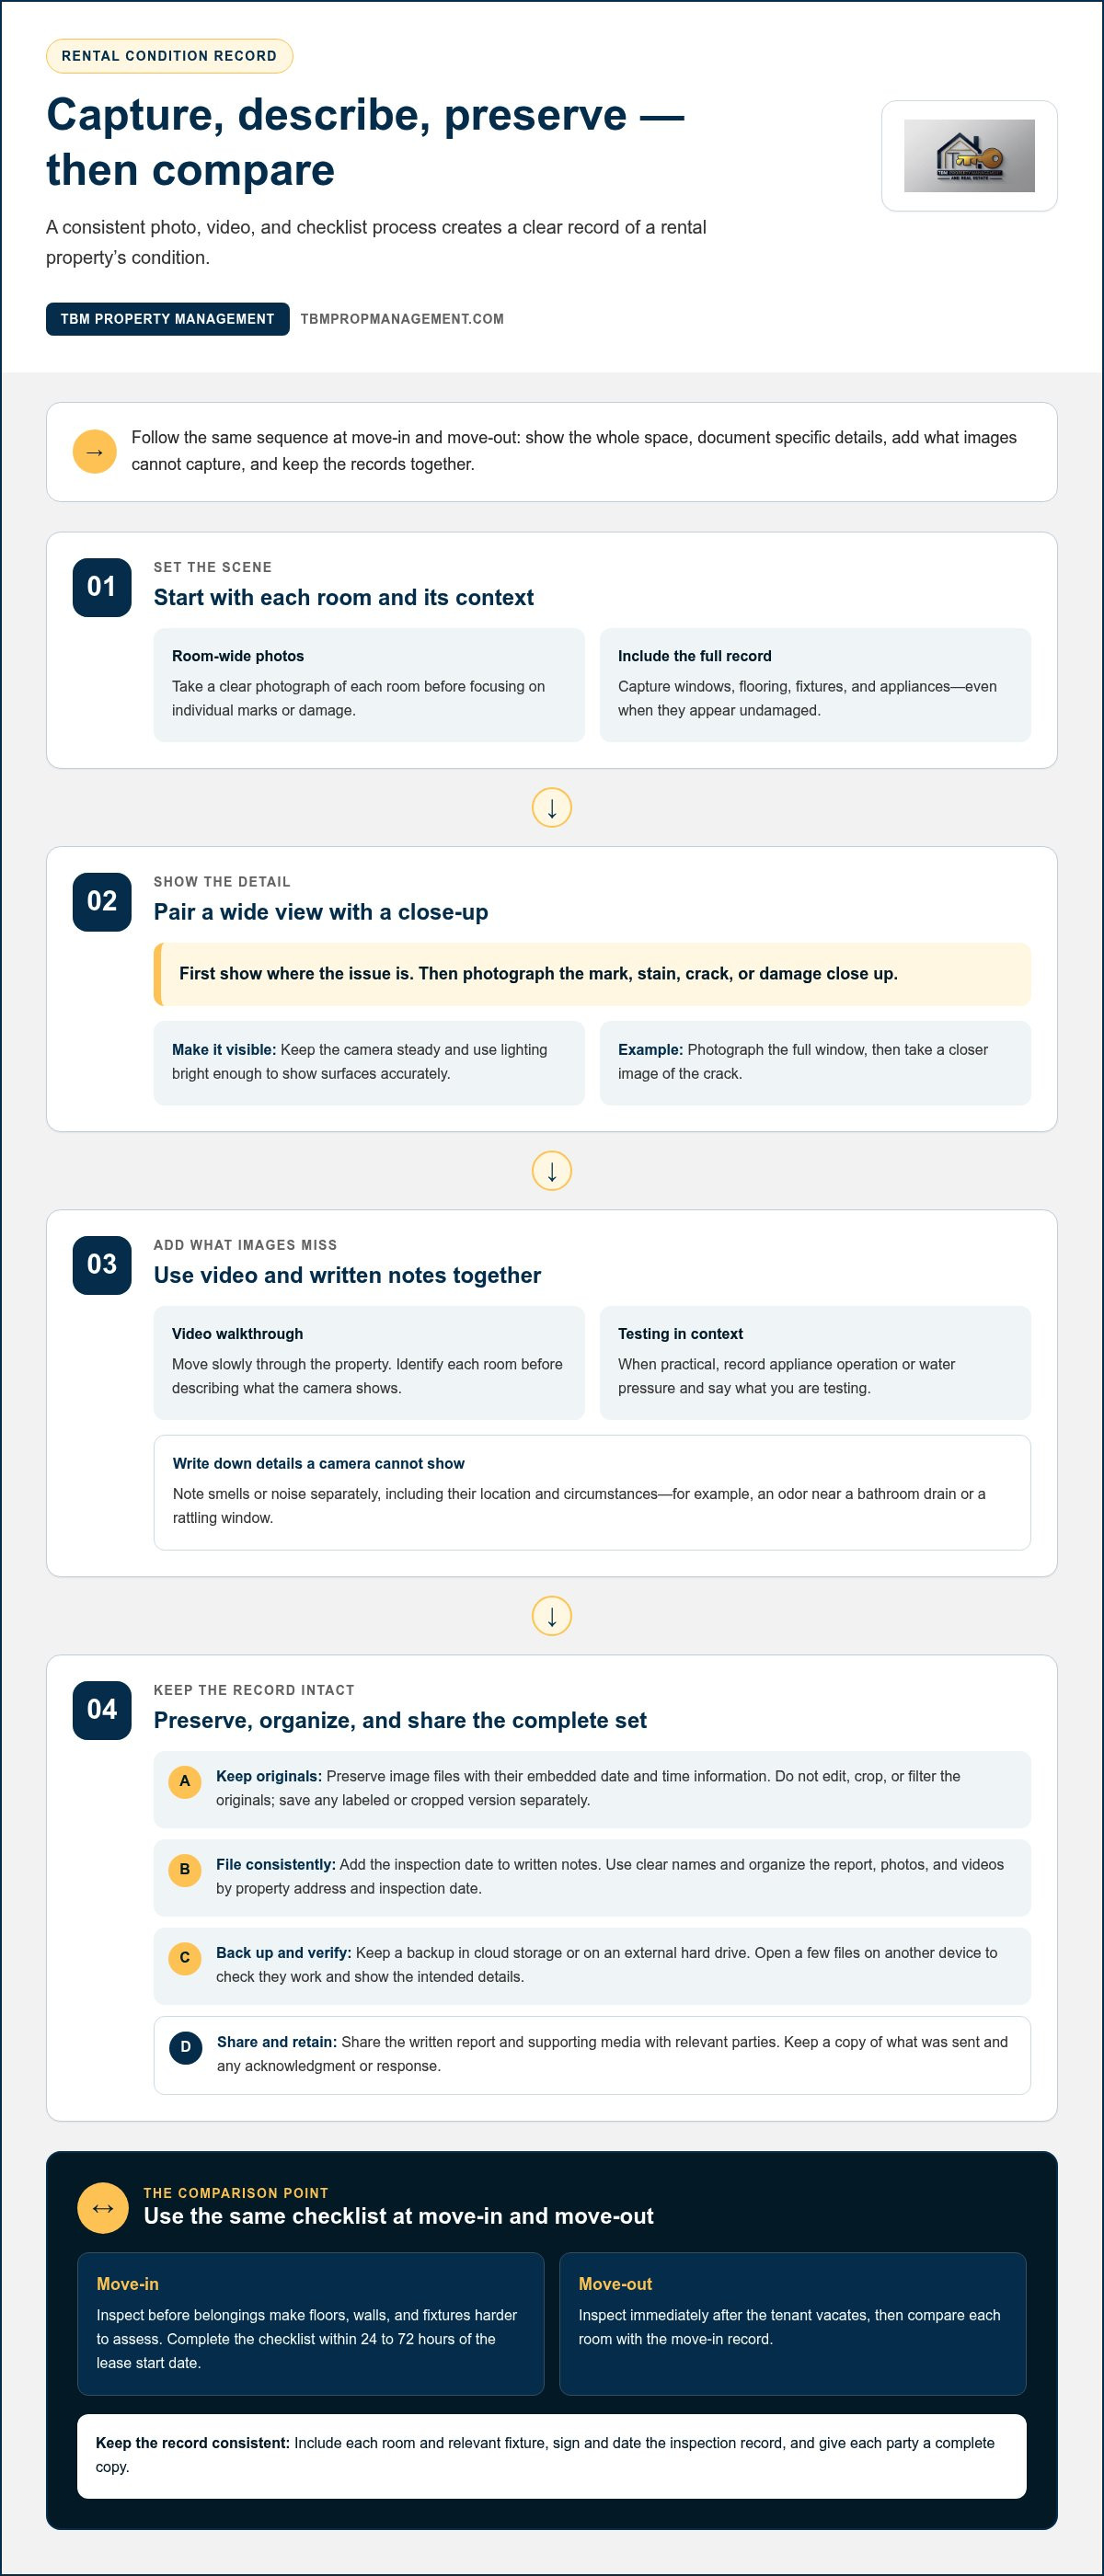
- Use photos and video together. Start with a clear photograph of each room, then capture close-ups of marks, stains, or damage. Take a wide view showing where each issue is, followed by a closer image of the detail. Include windows, flooring, fixtures, and appliances, even when they appear undamaged.
Keep the camera steady and the lighting bright enough to show surfaces accurately. For a cracked window, photograph the full window first, then the crack. This pairing provides useful context if someone reviews the evidence later. A video walkthrough can connect the rooms, but it shouldn’t replace still photos of specific defects.
- Narrate a video walkthrough as you move slowly through the property. Identify each room before describing what the camera shows, such as “living room, scuff beside the entrance.” When practical, record appliance operation or water pressure and state what you’re testing. A video can capture a faucet running or a door sticking in its frame.
Keep written notes alongside the recording. Smells and noise may not appear in images, so describe them separately, including their location and circumstances. For example, note a persistent odor near a bathroom drain or a rattling sound from a window. Written details clarify what the camera cannot show and tie observations to specific rooms.
- Preserve original image files so their embedded date and time information remains intact. Avoid editing, cropping, or filtering the originals. If you need a labeled or cropped version for easier review, save it separately and retain the untouched file. Add the inspection date to written notes and use consistent file names for rooms and issues.
Store the report, photos, and videos together in a clearly named folder. Back up the records to cloud storage or an external hard drive instead of relying on one phone. Organize files by property address and inspection date. Before sharing, open a few files on another device to confirm they work and show the intended details.
- Share the complete record with the relevant parties, including the written report and supporting media. Keep a copy of what you sent, along with any acknowledgment or response. If an issue leads to repairs, preserve messages and images showing the original condition and the work afterward. Clear dates and descriptions connect the evidence to the right event.
For recurring inspections or several rentals, a consistent digital filing routine can make records easier to retrieve. If property oversight is taking time away from other responsibilities, property inspection support can help keep the process organized.
Recording condition to help prevent security-deposit disputes
State rules differ. In Washington, landlords cannot collect a security deposit without a written move-in condition checklist signed and dated by both landlord and tenant, according to the Washington State Legislature. Minor scuffs can be normal wear, while burns, dents, deep scratches, and broken fixtures are examples of damage.
-
Keep Records at Each Tenancy Stage
Create a dated file for each tenancy stage: leasing, move-in, occupancy, and move-out. Keep the signed lease, condition checklist, inspection notes, tenant notices, and related replies together. Add records when a repair is requested or completed, noting the issue, location, and date. At move-out, compare the final inspection with the original record so both parties can see whether a mark or defect was documented earlier.
-
Record Safety and Cleanliness
Note whether smoke alarms, carbon monoxide detectors, locks, and fire extinguishers are present and working. Record cleanliness room by room, including visible dirt, pests, or mold, and photograph specific concerns. At move-out, use the same categories to distinguish a new condition from one noted earlier. Describe the location and severity rather than writing only “dirty” or “unsafe,” which leaves room for interpretation.
-
Document Damage and Wear
Describe each mark by room, surface, location, and appearance. For example, record a deep scratch near a doorway separately from ordinary carpet wear. Add a wide view for context and a close-up for detail, then match both images to the written entry. Compare move-in and move-out records before classifying a change. In Washington, photographs alone don’t justify a security-deposit deduction; an invoice, estimate, or repair receipt is also needed.
-
Keep Supporting Rental Records
Save rent increase notices with the lease, delivery record, and tenant correspondence. In Washington, landlords must give at least 90 days’ written notice before a rent increase. Keep a copy of the notice and its delivery details with the tenancy file. Organize maintenance requests, repair estimates, invoices, and receipts beside the relevant inspection notes. This connects a reported issue to the action taken and supports a clear record if questions arise.
Retain the completed file after move-out, including the signed checklist, dated photos, notices, and repair documents. Use a consistent property and tenancy naming system so records are easy to retrieve. Before closing the file, confirm that it includes both parties’ signed move-in record and the final condition comparison. A complete timeline makes it easier to explain how the property changed during the tenancy.
Utility meter readings and appliance details
Record utility readings and test included equipment during the same walk-through. A dated checklist can link each reading, appliance, and fixture to its observed condition.
- Locate each accessible utility meter and record its displayed reading, unit, meter identifier, and inspection date. Include electricity, gas, and water meters when they serve the rental property. If a meter is shared or inaccessible, note that clearly rather than estimating its reading. A photo of the display can support the written entry, especially when digits or labels are difficult to read.
At move-out, record the readings again using the same method. Keep both entries together for comparison. Don’t treat a change in consumption as proof of a leak or tenant damage by itself. Use the reading as a dated reference, then document any separate concern, such as a visible leak or unusual meter activity.
- List every supplied appliance and furnishing by room and type. For each item, record its make, model, and serial number when visible, along with its general condition. Note rust, dents, missing parts, worn controls, or damaged cords. For example, identify a kitchen range by its location and record a chipped control knob instead of writing only “stove damaged.”
Include furnishings named in the lease or left in the unit, such as a dining table or bedroom dresser. Mark items as present, absent, or damaged, and describe the detail supporting each entry. This inventory helps distinguish supplied property from a tenant’s belongings and gives the move-out review a useful reference.
- Test appliances using their ordinary controls, then record what happens. Turn on the oven, run the dishwasher, and check whether the refrigerator powers on. Note a clear problem, such as a dishwasher that won’t start, rather than guessing at the cause. For a washer or dryer, record the function tested and any unusual noise or visible issue.
Check lights, switches, and faucets as well. Run water and observe pressure, drainage, and leaks beneath sinks. Look for drips around faucet bases and supply connections, then record the fixture and exact location. If a system or appliance can’t be operated during the inspection, state what prevented the test, such as a disconnected appliance.
- Attach relevant notes and photos to the corresponding checklist entry. A wide view can show where an appliance sits; a close-up can show a dent, model label, or meter display. Keep original files with the written report, using consistent labels such as “kitchen refrigerator” or “water meter.” At move-out, compare those records before discussing changes or possible repairs.
Store the completed readings and appliance inventory with the lease and inspection records. A clear file makes it easier to find details if a question arises about a fixture, supplied furnishing, utility reading, or security deposit.
Documenting a property's condition at move-in and move-out
A move-in inspection records the rental before occupancy, while a move-out inspection records its condition after the tenant leaves. A consistent process for documenting rental property condition gives both inspections a clear point of comparison.
-
Document the Move-In Condition
Complete the move-in inspection while the rental is vacant and before belongings obstruct surfaces. Walk through each room with the condition report, recording existing marks, damage, and potential issues. Include floors, walls, fixtures, appliances, windows, and doors. Describe each concern by location and severity, such as a stain beside a bedroom closet. Take clear, dated photos to support the written entry.
-
Document the Move-Out Condition
Repeat the inspection after the tenant vacates, using the same room order and checklist categories. Compare each item with the original report rather than relying on memory. Note any difference, including its location and appearance, and capture supporting photos. Keep the move-in and move-out reports together so both parties can follow the condition timeline and review the same details.
- Invite the tenant to participate in the move-in walkthrough and share observations. Tenant participation isn’t legally required in every area, but it can help identify issues before the lease is signed. If the tenant can’t attend, send the completed report and invite written comments. Complete the Rental Property Move-In Checklist within three days of moving into the property, and keep a copy of the submitted version.
- Make each condition report specific enough to compare later. Replace “damaged cabinet” with a description such as “scratch on lower kitchen cabinet door, about three inches long.” Photograph the whole kitchen for context, then take a close-up of the scratch. Include rooms with no visible problems, too. A thorough record helps distinguish an existing mark from a change first observed after occupancy.
- Store both reports, related notes, and supporting files under the property address and inspection date. If a new issue appears after submitting the move-in checklist, document it separately and notify the landlord promptly. Keep written replies with that entry. Record any agreement about follow-up work or another resolution in the same file, not only in a text thread. Use the same method for documenting rental property condition at each tenancy transition.
- Use a consistent filing process for every tenancy so move-in and move-out records remain easy to compare. If coordinating property inspections takes time away from other responsibilities, explore property inspection support to help keep condition records organized.
TBM Property Management: Full-Service Property Management
TBM Property Management provides Full-Service Property Management for owners who want help coordinating rental responsibilities. If maintaining organized property records alongside leasing and tenant needs feels like too much to manage, its services can help keep the process on track. Property Inspections and Property Maintenance Coordination support consistent oversight and follow-up on property issues. Tenant Placement and Leasing Services help owners prepare for a new tenancy, while Rent Collection supports ongoing rental administration. Choose TBM Property Management when you want support with these management tasks instead of handling every detail alone. Contact TBM Property Management to discuss your rental property needs and how its services can support your next tenancy.
Make Your Next Tenancy Easier to Manage
A consistent record can support clearer conversations throughout a tenancy, but keeping property oversight organized takes time. If you’re planning a new rental or preparing for a tenant transition, consider how professional support could fit into documenting rental property condition and managing the next steps.
TBM Property Management offers Full-Service Property Management, Tenant Placement, and Leasing Services to help owners manage rental responsibilities. Choose the level of support that suits your needs, then take the next step at your own pace. Contact TBM Property Management to discuss your property management needs.
With a consistent process and the right support, you can move forward with greater clarity and confidence.
Frequently Asked Questions
Do I Need a Property Condition Report When Renting out My Property?
A written condition report gives you a dated record to compare with the property’s condition later. Requirements differ by state. In Washington, landlords cannot collect a security deposit without a written move-in checklist signed and dated by both parties, according to the Washington State Legislature. Even where a specific form isn’t required, include the report with the lease file and give the tenant a copy for their records.
Do photos count as documentation in a deposit dispute?
Yes, photos can support a condition report by showing what a written entry describes. For example, a dated image of a broken blind can clarify its location and appearance. In Washington, photos alone don’t justify a security-deposit deduction; an invoice, estimate, or repair receipt is also needed. Keep the original image files and connect each image to a specific report entry rather than relying on unlabeled photos.
How long should I keep records after a tenant moves out?
Keep the tenancy file until deposit matters and related disagreements are resolved, and retain it according to applicable record-retention requirements. Include the lease, inspection reports, tenant communications, repair documents, and deposit records. Store digital copies in a secure folder with a clear property name and move-out date. If a tenant later questions a charge, an organized file makes it easier to find the records behind that decision.
How many photos should I take for each room?
Take enough photos to show the whole room and clearly capture each notable issue; there’s no useful fixed count for every space. A small bathroom may need fewer images than a large living room with several damaged surfaces. Photograph the room from angles that show its layout, then take close-ups of marks or defects. Include clear images of areas without visible damage so the record isn’t limited to problem spots.
Is tenant presence required?
Tenant presence isn’t legally required in every area, though joining a walkthrough can reduce later disagreements. Invite the tenant to point out concerns and review entries during the inspection. If they can’t attend, send the report afterward and provide a way to submit comments in writing. Record differing observations without deleting the original entry so both perspectives remain clear in the file.
How should landlords document a rental property's condition before a tenant moves in?
Inspect the property while it’s vacant, before furniture or boxes block walls, floors, and fixtures. Use a room-by-room form, noting each issue’s location and appearance. Capture wide views for context and close-ups of specific marks. Record the inspection date, test included appliances, and note anything that couldn’t be checked. Share the completed report with the tenant and keep a copy with the lease.
What should a rental property move-in inspection checklist include?
Include each room and its main surfaces, fixtures, and systems: walls, floors, windows, doors, appliances, plumbing, and safety features. Add fields for an item’s location, observed condition, and follow-up notes. For example, record whether a window lock works and whether a kitchen faucet leaks. Include exterior areas such as the driveway or outdoor structures when they’re part of the rental, and leave space for additional observations.
How to take timestamped photos and videos for a rental condition report?
Set your device’s date and time correctly before the inspection, then take photos and video during the walkthrough. Keep original files so their embedded metadata remains intact, and avoid editing them. Add the inspection date and location to written notes, since a timestamp alone may not identify the room or issue. Save copies of the report and media in a secure digital folder and back them up.